This post was written by Rich Bosomworth.

Discover the acclaimed Team Guides for Software – practical books on operability, business metrics, testability, releasability
This is the second post in an on-going series exploring Rancher Server deployment, configuration and extended use. In the first post I detailed how to launch a local development environment using Vagrant and VirtualBox. In this post, we will look at how to deploy Rancher Server for single node resilience in AWS. Content is aimed at those familiar with AWS concepts and terminology and is best viewed from a desktop or laptop.
Series Links
Container Clustering with Rancher Server (Part 2) – Single Node Resilience in AWS
Container Clustering with Rancher Server (Part 3) – AWS EFS mounts using Rancher-NFS
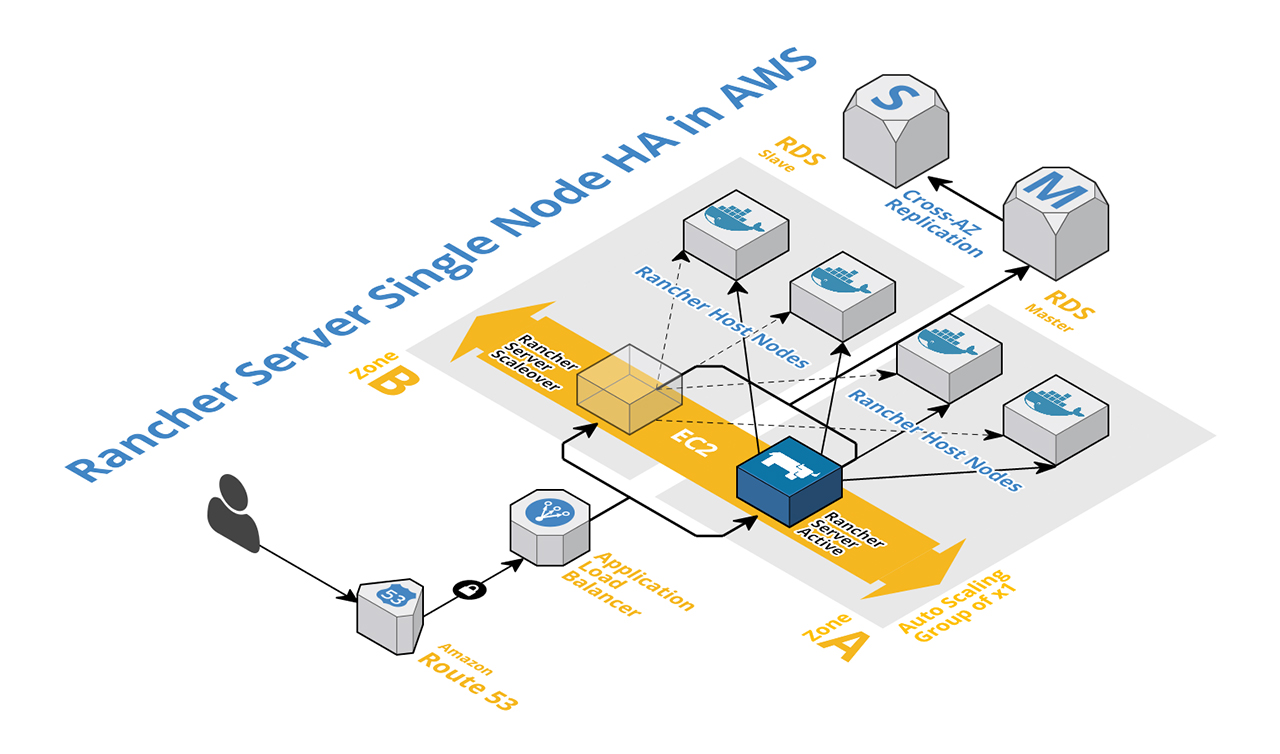
Rancher Server documentation advises on a multi-node configuration for HA, however by using a blend of AWS EC2 components easy server resilience can be achieved for a single node installation. The single node method provides a simpler configuration footprint with reduced instance costs, whilst still delivering multi-zone server instance scaleover.

Let’s take a look at a layout of the architecture involved. We shall then go through an explanation of the build and deployment process.
Prerequisites:
- AWS account
- IAM user account with appropriate permissions
- VPC configured with public and private subnets (public for ALB & EC2, private for RDS)
- ALB EC2 security group allowing port 8080
- EC2 security group for Rancher Server allowing port 8080 from the ALB SG
- RDS subnet and security group (private) allowing port 3306 from the Rancher Server EC2 SG
- RDS Multi-AZ instance
- Route53 DNS zone (optional)
To be created:
- ALB (Application load balancer)
- ALB target group
- EC2 launch configuration
- EC2 auto scaling group
Server build method:
Resilient x1 instance HA for Rancher Server is achieved in AWS EC2 by creating a launch configuration and an auto scaling group, with an application load balancer and a load balancer target group.
The launch configuration specifies the instance to be used, i.e. the AMI ID, plus any extra details of configuration (package installs etc.). Extra configuration can be specified using EC2 user data. User data allows you to run commands on your Linux instance at launch.
*NOTE* – The launch configuration must be configured to allocate a public IP to instances. Although security groups restrict public ingress, a public IP is required to enable egress connectivity. This allows instances to connect to the internet and download installation packages for Docker, and to pull the Rancher Server image from the Docker repo (although using a private repo is highly recommended).
The auto scaling group details metrics for scale, i.e. the maximum and minimum number of instances to run, along with triggers for scale up/down (CPU or memory load etc). The key for single node resilience is to specify a desired/min/max of x1 instance using a minimum of x2 subnets in different availability zones. In the event of a zone outage or instance failure scaleover will occur and a new instance will launch.
To facilitate DNS continuity during failover an EC2 load balancer is used, and from Rancher v1.2 an application load balancer (ALB) is required. An analysis of ALB functionality in comparison to ELB is outside the scope of this post.
The application load balancer references a target group listener into which auto scaled instances are placed. The target group is created first and then added as a listener from the load balancer (Fig:1)

Fig:1
Fig:2 shows how the target group and launch configuration are referenced from the auto scaling group.

Fig:2
RDS connectivity:
As shown in the architecture schematic an RDS Multi-AZ component is used to provide DB resilience. The instance specified in the launch configuration needs to know how to connect to RDS, and this is achieved via user data. For our single node Rancher stack we need to configure user data to take care of the following tasks:
- Ensure the Docker service is installed and running
- Install Rancher Server with a connection to RDS
*NOTE* – I use Amazon Linux for the Rancher Server launch configuration AMI. RancherOS would be preferred however I experienced issues when trying to pass user data at launch to RancherOS.
To connect to RDS we will be using the external DB installation method as described in the documentation. As specified, a pre-configured RDS instance is assumed, with a related security group and rules allowing access from the Rancher Server security group.
The user data block to install Rancher Server for a launch config using an Amazon Linux AMI would be as follows (update with your own RDS details):
#!/bin/sh
 sudo yum update -y
 sudo yum install -y docker
 sudo service docker start
 sudo docker run -d --restart=unless-stopped -p 8080:8080 rancher/server
  --db-host <rds-endpoint> --db-port 3306 --db-user <rds-user> --db-pass <rds-password> --db-name <rds-dbname>
Server launch:
When the auto scaling group is created, a server instance will launch. If everything is configured correctly the instance will register as healthy under the ALB target group (Fig:3)

Fig:3
To connect to Rancher Server, access the ALB DNS name on port 8080. The ALB DNS name is found by referencing the ALB configuration details under the description within the AWS EC2 console (Fig:4)
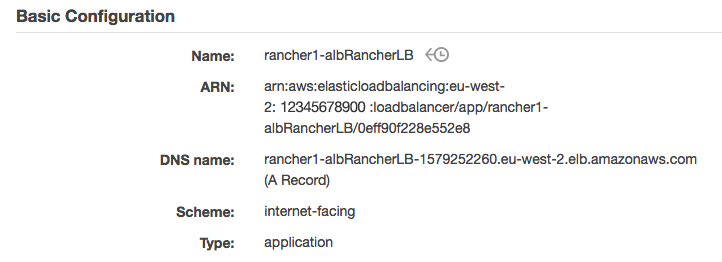
Fig:4
*NOTE* – Although not required it is cleaner to apply a friendly name to access the ALB. This is achieved using a Route53 alias record as described here.
EC2 host deployment:
The method for deploying EC2 hosts is detailed within the Rancher documentation, however we shall highlight some of the main points.
To deploy EC2 hosts within Rancher Server the first stage is to set the host registration URL (Fig:5). Options for this will be presented at first access from the menu item infrastructure/hosts/add host. By default, the registration URL will be the site address the server was accessed from (i.e. an ALB CNAME or Route53 alias). This can be changed to something else at a later stage should a Route53 alias be added or updated.

Fig:5

The next screen provides the option to select EC2 for adding hosts (Fig:6). Choose your region and input your IAM account AWS keys. Click ‘Next: Authenticate and select a network‘
Fig:6
At the next screen, you will be presented with a range of options for VPC, subnets etc. The main point of note here is the security group to be used for the hosts. For general deployments, it is recommended to accept the default standard ‘rancher-machine‘ group. This group will be dynamically created with all required port rules (Fig:67

Fig:7
The next screen provides options for host instance configurations and quantity (Fig:8). In the example, I have selected the RancherOS AMI ID for eu-west-1. As we don’t need to relay any user-data RancherOS is an excellent choice for host instances. RancherOS is very secure and lightweight as it comes with only the minimum amount of resources needed to run Docker. More information about RancherOS is available here.

*NOTE* – If you do choose to use RancherOS you must set the SSH User to rancher (the default is ubuntu).
Fig:8

On clicking ‘Create‘ the host nodes will be launched and configured. Once live they will report as active within the Rancher Server UI (Fig:9). You are now ready to deploy Docker containers or Rancher catalogue items to your hosts.
Fig:9

A nice feature with regard to instance security is the management by Rancher Server of EC2 SSH keys. Rancher Server dynamically creates and allocates one SSH key per host instance, deleting the key when an instance is removed. For example, with our x3 node deployment the following dynamic SSH keys were created (Fig:10)
Fig:10
Rancher Server resilience can be tested by manually terminating the running instance from within the AWS EC2 console. If you have configured your stack correctly the instance will relaunch and on access all previously deployed EC2 host nodes will still be registered and active.
In the next post, we will add an extra level of HA for shared storage by configuring an AWS EFS volume and mounting it using the Rancher-NFS service.

Minor point, it would have been Helpful for Dear Reader to have links at the start/end of thispost connecting to previous/next articles in the series. Thanks
LikeLike
Hi Steve, yes, I agree. I have updated the full series with retro-fit/links to each/all.
LikeLike
superstar! I noticed you’d done it already on some of them. brilliant content, thanks for taking the time! got me interested in Rancher now… damn you! 😀 Will you be going to the next Leeds AWS meetup?
LikeLike
Hi Steve, yes, I will be there for sure.
LikeLike
This is an excellent post and pretty much the architecture I was going for. However, I was going to do 2 instances of the server on full HA. I do like the single instance approach so I must ask:
Have you found any issues ‘killing’ the node and a new one coming up via auto-scaling?
LikeLike
Hi Xuxo, apologies for the delayed response. We have a refined version of the TF deployment using an ELB which you may be more interested in. Rancher moved to ALB, then reverted. It is available here – https://github.com/SkeltonThatcher/aws-terraform-rancher-single-node-ha-elb
However, in answer to your question, in our tests we had no issues with the single instance approach, other than the extra time taken for relaunch/reinitialise (against a dual/full HA configuration). That said, the old node does ‘hang about’ in the console (although not active). We never progressed to a solution to cleaning up inactive nodes but if you discover a solution we would be most interested.
LikeLike
No worries on the delay. I built my ‘Dev’ infrastructure the same way you have it and as long as RDS stays well, I am not afraid of ASG spinning up another node and re-attaching to the DB.
I am happy with it! Your posts are awesome, I am contemplating using your EFS write up for permanent storage.
Currently I have a ‘global’ environment proxy & Route 53 so I will just re-route traffic this way to my internal Rancher ‘stockyard’ <- actual name 🙂
LikeLike