
This post was written by Rich Bosomworth.
Rancher Server is an open source container management and orchestration platform. It can be installed in any Docker enabled Linux environment. This is the first of an on going series exploring options for Rancher Server deployment, configuration and extended use. Content is aimed at those familiar with Linux and networking concepts, as well as having an understanding of basic container technology.

Please note that RancherOS is a complimentary product and will be discussed in future posts. In this How-To we will be installing a local development environment of Rancher Server. The installation will be single node with basic database resilience for MySQL. We will be using Vagrant and VirtualBox to deploy cluster hosts using bridged networking to a local LAN. Links back to expanded documentation from the main Rancher website will be included.
Series Links
Container Clustering with Rancher Server (Part 2) – Single Node Resilience in AWS
Container Clustering with Rancher Server (Part 3) – AWS EFS mounts using Rancher-NFS
Preparation
*NOTE* – Rancher Server requires a Linux host for installation. Mac or Windows hosts are currently not supported.
For a local development and evaluation environment a Linux home server or workstation (desktop or laptop) would be suitable. A kernel of 3.10+ is required along with a minimum 1gb of available memory. Other prerequisite installs for this How-To are:
My own local development environment is a HP Microserver running Ubuntu Server 16.04LTS with Docker, Vagrant and a headless implementation of VirtualBox. I have also installed phpVirtualBox to provide added visibility and optional management.
Rancher Server Installation
Rancher Server can be installed using a single command:
sudo docker run -d -v <host_vol>:/var/lib/mysql --restart=unless-stopped -p 8080:8080 rancher/server
This command will check to see if the rancher/server container is available locally and/or pull it from the rancher repo. The container is set to restart unless stopped (i.e to relaunch after a reboot or container stalls). To provide basic database resilience /var/lib/mysql within the container is mounted to a host directory so substitute <host_vol> with a dir/location of your choice.
The example given exposes container port 8080 to host port 8080. If host port 8080 is already in use, for example if you have Jenkins installed, then modify the command to use an alternative (i.e 9090:8080).
The installation can take up to 5 minutes. Once live access the Rancher Server UI at http://<your_host_ip>:8080
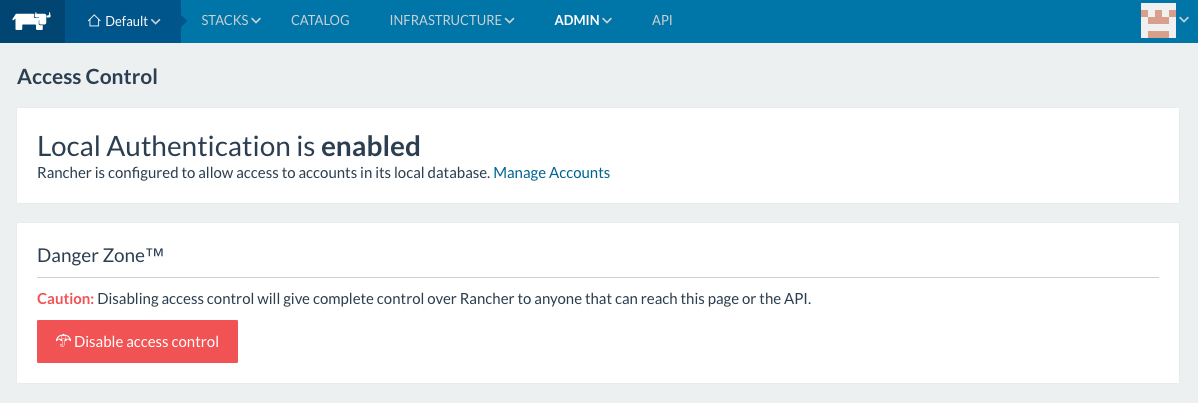
To secure your Rancher installation use the top bar menu links for Admin/Access Control. Select ‘Local Authentication‘ and set up a local Admin user (click the images to enlarge):

After choosing a user name and password click ‘Enable Local Auth’ to confirm.
Adding Rancher Cluster Hosts using Vagrant and VirtualBox
Here we will configure x3 Vagrant initialised VirtualBox VMs as self registering Rancher cluster hosts.
The host registration command can be obtained from Rancher through the top bar menu via Infrastructure/Hosts/Add Host.
For a new installation you will be required to confirm and save the host registration URL. As ours will be a local environment leave this as default.
In the example you will see my address as http://192.168.0.50:9090. This is the static IP address of my server on the LAN and is using port 9090.

Next we shall take steps to add cluster hosts. Configurations for Amazon EC2 and Azure hosts will be explored in a subsequent series covering cloud deployments. For the purposes of our localised environment we will be using the ‘Custom’ option.
Make a note of the registration command from section 5:

With the registration command saved we will now create a cluster host registration script. This will be referenced by the Vagrantfile for each node.
The allure of Docker pre-installed led me to explore options using Vagrant boxes from Project Atomic. I encountered network config (restart) issues with the Atomic boxes so switched to CentOS7, creating a host registration script as follows to install Docker first:
#! /bin/bash
yum update -y
curl -fsSL https://get.docker.com/ | sh
sudo systemctl enable docker.service
sudo systemctl start docker
<replace this line with the saved registration command from the previous stage>
Save the script as rancher.sh in the root of the directory you will be using for Vagrant.
*NOTE* – You can modify the registration command to use the latest version of the Rancher agent. To do so replace rancher/agent:v1.0.2 with just rancher/agent
Within your Vagrant directory create x3 folders named node1, node2 and node3.
Initialise the nodes from within each folder using the following command:
$ vagrant init centos/7
Modify the Vagrantfile inside each of the node folders by deleting the contents and replacing with the following:
Vagrant.configure("2") do |config|
 config.vm.provider "virtualbox" do |vb|
   vb.customize ["modifyvm", :id, "--memory", "1024"]
 end
 config.vm.box = "centos/7"
 config.vm.hostname = "vbx-node"
 config.vm.network "public_network", bridge: "enp2s0"
 config.vm.provision :shell, path: "../rancher.sh"
end
*NOTE* – enp2s0 is the name of the main network interface of my server, however yours may differ (For Ubuntu use ifconfig to list all available interfaces).
The modified Vagrantfile sets VM memory at 1gb. It uses/pulls the CentOS7 Vagrant box image and sets the VM hostname to vbx-node. Networking is set to bridged and assumes the LAN is configured to distribute DHCP addresses. The previously created rancher.sh script is referenced at the root location of the containing Vagrant directory.
To launch cluster host nodes use the following command from within each node folder
$ vagrant up
The VirtualBox VMs will appear as running. It takes a short while for them to update and configure for registration as cluster host nodes with the Rancher Server:
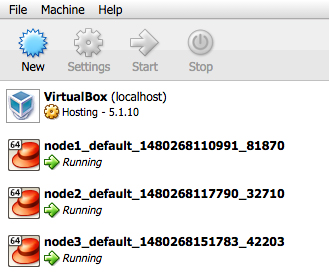
Once updated, the VMs will register with Rancher Server and appear in console as active cluster host nodes. The registration process takes a couple of minutes:

In following posts will look at HA configurations for Rancher Server within AWS, deploy EC2 instances as cluster host nodes, and create a load balanced application stack with applied DNS using pre-configured services from the Rancher catalog.
